
Generally, it is found that Administrator get in need to share their mailboxes. This is because in order to make the license available for the users leaving the organization. As, the user’s mailboxes can contain several important documents so it’s better to convert their mailboxes to the shared one.
Exchange 2013 mailbox can be converted to the shared mailboxes using two methods i.e., either by using Exchange Admin Center or by using PowerShell. So, let’s see the conversion using the Exchange Admin Center.
Using EAC (Exchange Admin Center)
For converting the mailboxes using Admin canter, first of all Open the EAC in your browser. Inside it, navigate to the Recipients tab at the left of the window & select any of the mailbox among the list. Thereafter, click on the option “Convert to Shared Mailboxes” at the right of the Window.
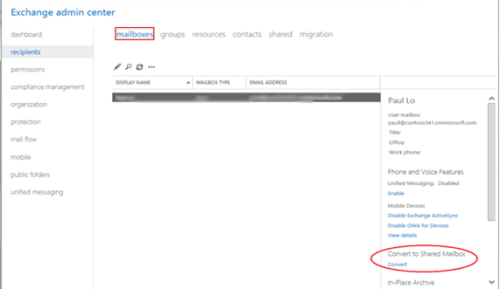
It might take several minutes, don’t be panic. The process takes a few minutes & it comes under the part of the process. As the process to convert mailbox to shared one finishes, you will get the converted shared mailbox.
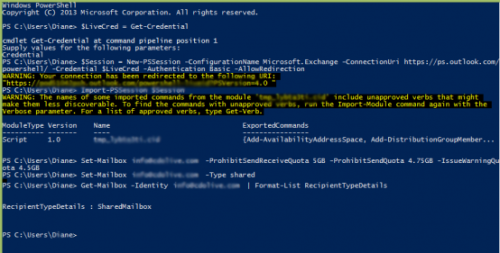
Using PowerShell
Using PowerShell, Exchange 2013 mailboxes can also be converted to the shared one. For this, users need to run some specific cmdlets. That specific cmdlets are-
Set-Mailbox info@domain.com -Type shared
Note: In case, you are going to create the shared mailbox in Plan 1 or Plan 2, you need to set the Qu7ota to 10 GB before conversion process.
Set-Mailbox info@domain.com -Type shared -ProhibitSendReceiveQuota 10GB -ProhibitSendQuota 9.5GB -IssueWarningQuota 9GB
Set-Mailbox info@domain.com -Type shared
As this command runs, the Exchange 2013 will automatically converted to the shared one. You can also verify this whether your mailbox has converted to shared mailbox or not. For this, you need to run one another command.
Get-Mailbox -Identity info@domain.com
| Format-List RecipientTypeDetails
After converting the mailboxes, you need to provide Full Access & Send as Permissions to other users.
For giving Full Access Rights & Send as Permissions, you need to run the following PowerShell commands:
- For FullAccess rights: Add-MailboxPermission username -User newuser
-AccessRights FullAccess
-
For SendAsPermission: Add-RecipientPermission username -Trustee newuser -AccessRights SendAs
Conclusion:
So, in this blog segment, we have the two methods through we can convert Exchange 2013 Mailbox to the Shared Mailbox. The very first method is using the Exchange Admin Center & the other one is by using the PowerShell commands. However, both the methods are too easy, but you need to be little bit careful while running the PowerShell commands.

Comments