
Issue:
KACE Technical Support has requested that you need to ENABLE A TETHER on your Appliance for additional technical support measures or assistance from Engineers.
- activating a Tether will only be requested by the KACE Support Team. After a tether is enabeled it will only remain "active" for a limited amount of time; so please perform the requested steps in a timely manner so you will be able to get the needed support by the KACE Team.
By applying this tether key, you agree to the below terms:
- A KACE engineer will have full root access to your KBOX including log files, help desk, inventory, provisioning schedules, etc.
- If the KBOX needs to be taken offline or rebooted, we will notify you before hand, unless instructed otherwise.
Pre-requisites:
The target K1000/K2000 Appliance must be able to connect on port 22 outbound to tether.kace.com. This will allow an SSH tunnel to our tether server. If a firewall or security policy is blocking this, it will not work.
Additionally, you will need to have "SSH Enabled" (see "Additional Notes" below on how) and you will need to have "Enable Database Access" as well. (this setting is on the same page as the SSH setting)
Resolution:
How to apply a tether to a K1000 Series Appliance:
- Log into the Appliance with Admin credentials or an Admin Role
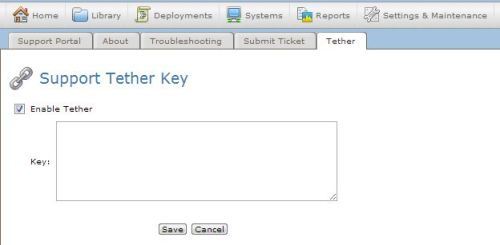
Go to: K1000 Settings--> Support [tab]--> Troubleshooting Tools--> [edit mode]--> Check the box "Enable Tether"
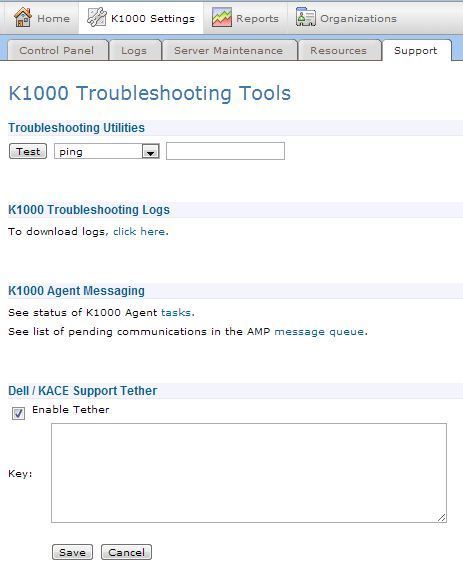
After the "Enable Tether" box is checked, the field will open in the window below that. This is where you will place the tether key provided by KACE Technical Support.
- "paste" the tether key provided by KACE into this open box
- the key will contain NO LINE BREAKS and will have one or more "="
EXAMPLE of a tether key:
YcBIaiugRQ**%%$$##AM8PGg0cuYlhXydRWNXayxrsP1VKIGbvMbavenDTB3y+PTH2aq6
xh6Bx/jU0fpxn6F&&%%$$EkVyZZU5QTi/6syzen2Yso1fmnYnZwtS++cqp4GxXPk4nmd
zF5JQSDgG0JivElMokGCtDN7Zvu+yuBtW7jX2cJiIr13mqp3HOWE0eTSOrZtQx2w
FiFKQZUJgVIjcGINVmEC716btk47AUkWYWZyPO0ww3xSUX65JAFvZb3u13ONMm/4
EyG27wk8M8f/a6TZN8WFvI9RHVbdoQ7zfYNG2S!@#$%^&*()oHUgra+tJxHvwTVEqsJ7Bd
WA==
After the key is applied, click "Save" and you will see the information displayed similar, not exactly, to what is shown below:
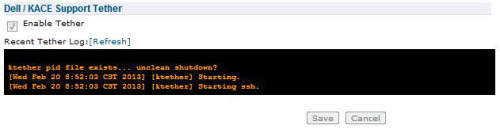
This will indicate that the tether was applied successfully. If you encounter additional errors or connection failures that are not addressed by the pre-requisites, please ensure that you have "pasted" the key accurately as it was provided to you.
- sometimes additional characters or spaces are added by mistake when the "copy" function is performed (this is a common cause of an inaccurate tether key) Please re-check the tether key you applied.
- if the tether connection issue still persists, please contact KACE technical support (see "Additional Notes" below on how)
How to apply a tether to a K2000 Series Appliance:
- Log into the Appliance with Admin credentials or in an Admin Role
Go to: Help (upper-right corner of the webgui)--> (click on) KACE Support Tether
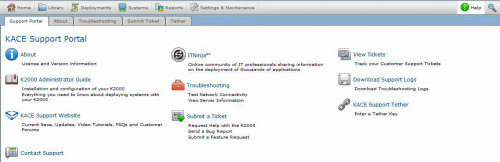
On the new page that is loaded: click [edit mode]--> Check the box "Enable Tether"
After the "Enable Tether" box is checked, the field will open in the window below that. This is where you will place the tether key provided by KACE Technical Support.
- "paste" the tether key provided by KACE into this open box
- the key will contain NO LINE BREAKS and will have one or more "="
(reference K1000 "EXAMPLE tether key" above as needed)
After the key is applied, click "Save" and you will see the information displayed similar, not exactly, to what is shown above in the K1000 example.
Additional Notes:
How do I contact KACE Technical Support? http://www.itninja.com/blog/view/kace-how-do-i-contact-kace-technical-support
How do I Enable SSH on my K1000 Appliance? http://www.itninja.com/blog/view/how-do-i-enable-ssh-on-my-k1000-appliance

Comments