
Previously, we looked at installing Adobe Reader XI via the Software Library. This article focuses on installing the Oracle Java Runtime Environment 7. As before, users will be able to use this item to install the program on their computers without needing to elevate their local permissions.
The installer can be downloaded here: http://www.oracle.com/technetwork/java/javase/downloads/index.html
For this example, we will be using the 64 bit version of the installer, but the process is essentially the same for the 32 bit version.
Before we can set up the Software Library item, we must first have a listing for the program in Software Inventory. The easiest way to do this is to manually install the program on a test box that has the KACE agent installed, then forcing an inventory update on that system.
Once the program has been added to your software inventory, browse to the listing and select the supported Operating Systems and upload the .exe to associate it. Once it’s uploaded, save the item.
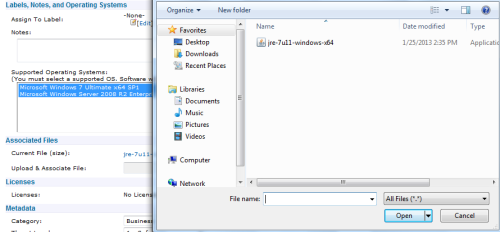
Once the file has been uploaded to the KBOX, go to Service Desk>Software Library and choose Add New Item from the dropdown.

Select Install for the Package Type, then select the program from the dropdown list.
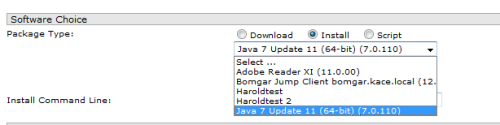
Once it’s selected, use the following command line to install:
jre-7u11-windows-x64.exe /s
This will do a silent install of the application. You may want to add additional parameters to the installation. You can do so by adding them to the command line.
Paramters:
AUTOUPDATECHECK = enables or disables automatic check for update
JAVAUPDATE = enables or disables updates
JU = enables or disables updates
MOZILLA = 1 = register java with mozilla
IEXPLORER = 1 = register java with ie
For this example, we want to disable automatic updates and prevent the system from being restarted by the application, so we will use the following command line:
jre-7u11-windows-x64.exe /s /v"/norestart AUTOUPDATECHECK=0 JAVAUPDATE=0 JU=0"
*Note: You can also add installation instructions to the page if you desire, and limit access to specific user labels. If you would like more information on these features, please refer to the Service Desk Administrator Guide at http://www.kace.com/support/resources/documentation
Click the Enabled check box at the top of the window, and then click Save. Click OK on any informational pop-ups that come up. You may see the Package Type bubble change to Download after saving. DO NOT CLICK SAVE AGAIN. Instead, just navigate to any other page in the KBOX.
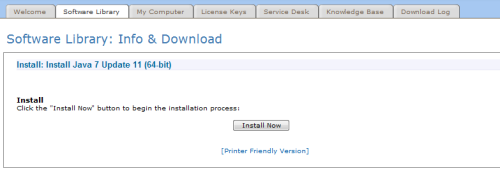
Once it’s created, users can install from the Software Library by navigating to the user portal and selecting the item. Once there, all they have to do is click Install Now.

Comments