
How to Programmatically Reset UEFI to boot to IPv4 first After Scripted Windows Install sets Windows as First Boot?
I've googled and Duck-Duck-Go'd for two and a half days on this, and found one hit that says he solved the problem, but by writing a program in C, which is not completely beyond me, but it's completely beyond my current skill/time/learning resources.

I know Linux has a program (efibootmgr) which can tweak the firmware, and I know Windows can do so under-the-hood (because the Shift-Reboot boot options allows you to select the next boot to be IPv4, and because the Windows install does so, changing the boot order to put Windows first). My web searching has led me to think "bcdedit" is the solution, but setting the IPv4 option to be the default (bcdedit set /default {IPv4's ID num}), or the next boot (bcdedit /bootsequence {IPv4's ID num}) has no effect.
Although this is more of a Windows question than a KACE question, I'm not sure where best to ask it other than here on ITNinja, so I'm hoping someone here has an answer/solution.
Thanks!
When you set your Dell's firmware to boot first to the network (so the K2 can decide what to do next with the box), when you do a scripted install of Windows, Microsoft deems it knows better than you and sets the first boot to Windows.
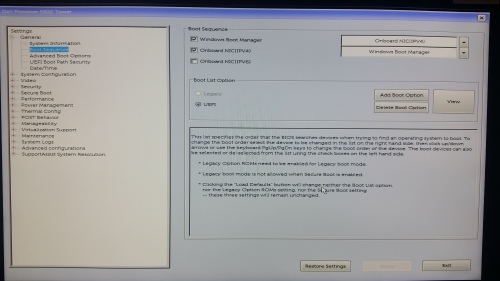
Before Windows Install on Top (notice the "Apply" button is grayed out, showing that I've already applied these settings); After on Bottom.
I know Linux has a program (efibootmgr) which can tweak the firmware, and I know Windows can do so under-the-hood (because the Shift-Reboot boot options allows you to select the next boot to be IPv4, and because the Windows install does so, changing the boot order to put Windows first). My web searching has led me to think "bcdedit" is the solution, but setting the IPv4 option to be the default (bcdedit set /default {IPv4's ID num}), or the next boot (bcdedit /bootsequence {IPv4's ID num}) has no effect.
Although this is more of a Windows question than a KACE question, I'm not sure where best to ask it other than here on ITNinja, so I'm hoping someone here has an answer/solution.
Thanks!
/Kent
4 Comments
[ + ] Show comments
Answers (2)
Answer Summary:
Please log in to answer
Posted by:
kentwest
5 years ago


Top Answer
For Dell computers, there's a Dell utility, "Dell Command | Configure" (version 4.x; version 3.x works differently) that will do the job. (It's hard to find.)
Once installed, you can see the boot order with this command:
C:\Program Files (x86)\Dell\Command Configure\X86_64\cctk.exe BootOrder --BootListType=uefi
which will result in something like this:
C:\Program Files (x86)\Dell\Command Configure\X86_64>cctk.exe BootOrder --BootListType=uefi
DeviceStatus DeviceNumber DeviceType Shortform DeviceDescription
-------------------------------------------------------------------------
Enabled 0 Hard Disk hdd Windows Boot Manager
Disabled 1 UEFI Device uefi.1 Onboard NIC(IPV6)
Enabled 2 UEFI Device uefi.2 Onboard NIC(IPV4)
-------------------------------------------------------------------------
You can use DeviceNumber or shortform to set the boot order.
Example1: cctk BootOrder --BootListType=uefi --Sequence=2,1,3 --DisableDevice=1 --EnableDevice=2,3
Example2: cctk BootOrder --BootListType=uefi --Sequence=cdrom,hdd.2,hdd.1 --DisableDevice=hdd.2 --EnableDevice=cdrom,hdd.1
In file operation, same command can write like BootOrder=+cdrom,-hdd.2,+hdd.1
and then, using the info above, to set the IPv4 as the first boot device, you'd use a command like:
cctk.exe BootOrder --BootListType=uefi --Sequence=2,0 --ValSetupPwd=[your firmware password]
Above, Channeler had mentioned this tool, but in conjunction with Powershell scripting, which added another layer of complexity. The Powershell route is just using Powershell as a "wrapper" around this tool, and might be of value in some cases, (particularly to Powershell fans), but for me, just using the bare tool from a command line (or batch file) was simpler.
Comments:
-
Waay to complicated. With a Dell, you can easily control this by using bcdedit - just need to set the order directly in the {fwbootmgr} entry. Scripting this is trivial - don't even need to use the horrible Powershell. - skogan 5 years ago
-
I spent a day and a half trying to do this in a batch script, but batch is just too limited for me to be successful manipulating the output of bcdedit.
I'm close in Powershell (and I agree with you that Powershell is horrible), but I'm having trouble yet, with the last line (I get "bcdedit.exe : The command parameter was already specified."). Below is my script.
<code>
# Create text file containing firmware settings
bcdedit /enum firmware > firmware.txt
# Find the line containing "IPV4", and read the line just before that
$FullLine = (( Get-Content .\firmware.txt | Select-String "IPV4" -Context 1 ).context.precontext)[0]
# Delete our temporary file
del firmware.txt
# Split line into fields using the first left-curly as the delimiter,
# and then grab the second field (and restore the first left-curly)
$GUID = '{' + $FullLine.split('{')[1]
# Set the boot order
bcdedit /set {fwbootmgr} displayorder $GUID {bootmgr}
</code> - kentwest 5 years ago
Posted by:
skogan
5 years ago

My experience with a Dell Optiplex has been that you can easily modify the UEFI boot order from within Windows. Here is the procedure:
Find out the GUID for the Onboard NIC entry:
bcdedit /enum firmware
This will give you all the firmware entries currently in UEFI. One of them should be "Onboard NIC(IPV4)" use it's GUID in the following command
bcdedit /set {fwbootmgr} displayorder <GUID> {bootmgr}
Caveat: This might not work with other vendors' UEFI BIOS.
https://www.dell.com/support/article/us/en/04/sln308268/dell-command-configure-unable-to-change-the-boot-list-options-using-ini-files?lang=en
https://www.youtube.com/watch?v=A9TeUPzOmLE
You could first find a way to make the PS script work, make sure it is indeed changing the boot order in the BIOS.
Then create one post install task to install DELL Command Configure tool, then a second Powershell post install task to push the changes.
But is not a walk in the park, see:
https://www.dell.com/community/Enterprise-Client/Dell-Command-Configure-bootorder/td-p/5075223 - Channeler 5 years ago
But I'll look into this a bit more when I have the chance. Thanks! - kentwest 5 years ago
I understand you to be saying that BCDEDIT does not alter the firmware settings. (We're booting from UEFI, not BIOS; I suspect you're still using BIOS booting, which is probably why you're not seeing the change happening.)
I could never find a definitive statement to that effect, and knowing that Windows itself seems to alter the firmware settings (as it can configure *something* to boot from the network), and knowing that the Linux tool efimanager can alter the firmware settings, and knowing that BCEDIT discussions seem to indicate that it alters the firmware settings, I assumed that BCDEDIT actually does alter firmware settings. But I understand you to be saying that's incorrect.
So, BCDEDIT is not the route for telling the computer to boot from the network.
So what is the correct way to, programmatically, boot the computer from the network? Channeler's suggestion to use a Dell tool might work, but when I went to download it, it looks like there's a different version of the tool for every Dell model (or at least, the download wanted my model and/or service tag number and acted like it mattered), and I haven't had a chance to chase that option down any further yet. I would prefer something built into Windows (since Windows can apparently do it for itself) instead of having to download a third-party tool for different makes/models of computers.
Thanks! - kentwest 5 years ago
Once installed, you can see the boot order with this command:
C:\Program Files (x86)\Dell\Command Configure\X86_64\cctk.exe BootOrder --BootListType=uefi
which will result in something like this:
C:\Program Files (x86)\Dell\Command Configure\X86_64>cctk.exe BootOrder --BootListType=uefi
DeviceStatus DeviceNumber DeviceType Shortform DeviceDescription
-------------------------------------------------------------------------
Enabled 0 Hard Disk hdd Windows Boot Manager
Disabled 1 UEFI Device uefi.1 Onboard NIC(IPV6)
Enabled 2 UEFI Device uefi.2 Onboard NIC(IPV4)
-------------------------------------------------------------------------
You can use DeviceNumber or shortform to set the boot order.
Example1: cctk BootOrder --BootListType=uefi --Sequence=2,1,3 --DisableDevice=1 --EnableDevice=2,3
Example2: cctk BootOrder --BootListType=uefi --Sequence=cdrom,hdd.2,hdd.1 --DisableDevice=hdd.2 --EnableDevice=cdrom,hdd.1
In file operation, same command can write like BootOrder=+cdrom,-hdd.2,+hdd.1
and then, using the info above, to set the IPv4 as the first boot device, you'd use a command like:
cctk.exe BootOrder --BootListType=uefi --Sequence=2,0 --ValSetupPwd=[your firmware password] - kentwest 5 years ago