
Setting Default App Assocations via Post-Install Task
Good morning Ninjas,
I've recently created a new Windows 10 Enterprise standard image for run-of-the-mill deployments to staff. One of the things that did not work however was my default app associations. What I'd like to do is resolve this with a post-installation task as opposed to recapturing an image.
What I don't know is if I can grab the default app xml file and set it in the registry with a post-install task, or if it would be easier to setup a post-install task that creates a run-once script that calls DISM and sets the defaults when a user logs in for the first time.
Also, any advice....:)
Thanks,
-- Ray
0 Comments
[ + ] Show comments
Answers (4)
Please log in to answer
Posted by:
SMal.tmcc
7 years ago


here is what I do, quick and simple.
My master sits on a physical machine. I use the user "administrator" to install and customize all settings under (that profile is copied to default during sysprep)
I do a manual profile file cleanup and run disk cleanup.
I use control panel - backup and restore - create a system image to backup the master to a second HDD prior to sysprep that way I can restore that and update for the next revision quickly and easy.
To start sysprep I use this batch file (run as administrator)
The machine starts sysprep and shuts down. I boot to kace and capture
Create and Deploy using this midlevel task

My master sits on a physical machine. I use the user "administrator" to install and customize all settings under (that profile is copied to default during sysprep)
I do a manual profile file cleanup and run disk cleanup.
I use control panel - backup and restore - create a system image to backup the master to a second HDD prior to sysprep that way I can restore that and update for the next revision quickly and easy.
To start sysprep I use this batch file (run as administrator)
start /wait notepad.exe C:\Windows\w2d\tmccimageversion.regThe tmccimageversion.reg file brands each image into the k1000 inventory to help us identify what image is on what machine easily
start /wait regedit /s C:\Windows\w2d\tmccimageversion.reg
Dism /Online /Export-DefaultAppAssociations:c:\AppAssoc.xml
cd\windows\system32\sysprep
sysprep /generalize /oobe /shutdown /unattend:c:\windows\system32\sysprep\adminw10x64.xml
Windows Registry Editor Version 5.00Here is one of my answer files I write:
[HKEY_LOCAL_MACHINE\SOFTWARE\Microsoft\Windows\CurrentVersion\Uninstall\TMCC IMAGE INFO]
"Comments"="Fall 2016"
"Contact"="SMal"
"DisplayVersion"="Acad64W10F16 Sie112 090416"
"HelpTelephone"="57800"
"Publisher"="WIM file F16sie112"
"DisplayName"="TMCC Sie112 F16Acad Image"
<?xml version="1.0" encoding="utf-8"?>
<unattend xmlns="urn:schemas-microsoft-com:unattend">
    <settings pass="generalize">
        <component name="Microsoft-Windows-Shell-Setup" processorArchitecture="amd64" publicKeyToken="31bf3856ad364e35" language="neutral" versionScope="nonSxS" xmlns:wcm="http://schemas.microsoft.com/WMIConfig/2002/State" xmlns:xsi="http://www.w3.org/2001/XMLSchema-instance">
            <OEMInformation>
                <Manufacturer>TMCC ITO</Manufacturer>
                <Model>Acad Image</Model>
                <SupportHours>8-5</SupportHours>
                <SupportPhone>673-7800</SupportPhone>
                <SupportURL>http://www.tmcc.edu/it/contact/</SupportURL>
            </OEMInformation>
            <DoNotCleanTaskBar>true</DoNotCleanTaskBar>
        </component>
    </settings>
    <settings pass="specialize">
        <component name="Microsoft-Windows-Deployment" processorArchitecture="amd64" publicKeyToken="31bf3856ad364e35" language="neutral" versionScope="nonSxS" xmlns:wcm="http://schemas.microsoft.com/WMIConfig/2002/State" xmlns:xsi="http://www.w3.org/2001/XMLSchema-instance">
            <RunSynchronous>
                <RunSynchronousCommand wcm:action="add">
                    <Order>1</Order>
                    <Path>net user administrator /active:yes</Path>
                </RunSynchronousCommand>
            </RunSynchronous>
        </component>
        <component name="Microsoft-Windows-Shell-Setup" processorArchitecture="amd64" publicKeyToken="31bf3856ad364e35" language="neutral" versionScope="nonSxS" xmlns:wcm="http://schemas.microsoft.com/WMIConfig/2002/State" xmlns:xsi="http://www.w3.org/2001/XMLSchema-instance">
            <TaskbarLinks>
                <Link0>%ALLUSERSPROFILE%\Microsoft\Windows\Start Menu\Programs\Mozilla Firefox.lnk</Link0>
                <Link1>%ALLUSERSPROFILE%\Microsoft\Windows\Start Menu\Programs\Google Chrome.lnk</Link1>
		<Link2>%ALLUSERSPROFILE%\Microsoft\Windows\Start Menu\Programs\Internet Explorer.lnk</Link2>
            </TaskbarLinks>
            <DoNotCleanTaskBar>true</DoNotCleanTaskBar>
            <ComputerName>*</ComputerName>
            <CopyProfile>true</CopyProfile>
            <ProductKey>NPPR9-FWDCX-D2C8J-H872K-2YT43</ProductKey>
            <EnableStartMenu>true</EnableStartMenu>
        </component>
    </settings>
    <settings pass="oobeSystem">
        <component name="Microsoft-Windows-Shell-Setup" processorArchitecture="amd64" publicKeyToken="31bf3856ad364e35" language="neutral" versionScope="nonSxS" xmlns:wcm="http://schemas.microsoft.com/WMIConfig/2002/State" xmlns:xsi="http://www.w3.org/2001/XMLSchema-instance">
            <AutoLogon>
                <Password>
                    <Value>VwBpAG4AZABsGSdGfsdGfsdGHFSDGHsGEAcwBzAHcAbwByAGQA</Value>
                    <PlainText>false</PlainText>
                </Password>
                <Enabled>true</Enabled>
                <LogonCount>5</LogonCount>
                <Username>administrator</Username>
            </AutoLogon>
            <OOBE>
                <HideEULAPage>true</HideEULAPage>
                <HideLocalAccountScreen>false</HideLocalAccountScreen>
                <HideOEMRegistrationScreen>true</HideOEMRegistrationScreen>
                <HideOnlineAccountScreens>true</HideOnlineAccountScreens>
                <HideWirelessSetupInOOBE>true</HideWirelessSetupInOOBE>
                <ProtectYourPC>3</ProtectYourPC>
            </OOBE>
            <UserAccounts>
                <AdministratorPassword>
                    <Value>VwBpAG4AZABvAHcAcSDgsdfGHfsdGHFSDHsdhSDHsdfGHsdhAHQAbwByAFAAYQBzAHMAdwBvAHIAZAA=</Value>
                    <PlainText>false</PlainText>
                </AdministratorPassword>
                <LocalAccounts>
                    <LocalAccount wcm:action="add">
                        <Password>
                            <Value>VgfSADgSDFGsdfwBpAG4AZABvAHcAcwAxADAAIwAdABQAGEAcwBzAHcAbwByAGQA</Value>
                            <PlainText>false</PlainText>
                        </Password>
                        <Description>IT backup</Description>
                        <DisplayName>DFault</DisplayName>
                        <Name>Dfault</Name>
                    </LocalAccount>
                </LocalAccounts>
            </UserAccounts>
            <WindowsFeatures>
                <ShowMediaCenter>false</ShowMediaCenter>
            </WindowsFeatures>
            <RegisteredOrganization>TMCC</RegisteredOrganization>
            <RegisteredOwner>Student</RegisteredOwner>
            <DesktopOptimization>
                <GoToDesktopOnSignIn>true</GoToDesktopOnSignIn>
                <ShowWindowsStoreAppsOnTaskbar>false</ShowWindowsStoreAppsOnTaskbar>
            </DesktopOptimization>
            <EnableStartMenu>true</EnableStartMenu>
            <DoNotCleanTaskBar>true</DoNotCleanTaskBar>
        </component>
        <component name="Microsoft-Windows-International-Core" processorArchitecture="amd64" publicKeyToken="31bf3856ad364e35" language="neutral" versionScope="nonSxS" xmlns:wcm="http://schemas.microsoft.com/WMIConfig/2002/State" xmlns:xsi="http://www.w3.org/2001/XMLSchema-instance">
            <InputLocale>en-us</InputLocale>
            <SystemLocale>en-us</SystemLocale>
            <UILanguage>en-us</UILanguage>
            <UserLocale>en-us</UserLocale>
        </component>
    </settings>
    <cpi:offlineImage cpi:source="wim:c:/win10x64source/sources/install.wim#Windows 10 Enterprise Technical Preview" xmlns:cpi="urn:schemas-microsoft-com:cpi" />
</unattend>
The machine starts sysprep and shuts down. I boot to kace and capture
Create and Deploy using this midlevel task
Posted by:
therealredzac
7 years ago

For new installations / first logins:
Take a look at "%windir%\System32" called “OEMDefaultAssociations.xml”
This will set the defaults for the OS before the explorer loads, and policies process.
Just remove the line for PDF / Edge.
Posted by:
alexsaucedo
7 years ago

On a PC with desired defaults
To create your own custom XML file, set the desired defaults on any computer (or the pc that will be imaged).
Run the following command:
Dism /Online /Export-DefaultAppAssociations:\\Server\Share\AppAssoc.xml
On the Gold Image
Create a new folder on the C:\ on the gold image called FileAssociationList
Copy the XML file(s) to the FileAssociationList folder
Go to:
C:\Windows\System32
Locate the file called: OEMDefaultAssociations.xml
Right click but do not click edit, you will get an error message
Right click, select open with and select notepad
You will need to delete all of the contents. Don’t worry about deleting the OEM defaults. When you import your custom XML file, it will write new data to this file (new OEM Defaults).
Click File Save
Sysprep the computer and upload to KACE
K2000 Script
Create a post-installation task
Select Add BAT Script
For Runtime Environment – Select K2000 Boot Environment (Windows)
BAT Script Contents:
dism /image:c:\ /Import-DefaultAppAssociations:c:\FileAssociationList\SetDefault-IE.xml
Place the default app script before the Apply Computer Name script.
All of the changes may or may not apply to the local admin account.
Posted by:
SMal.tmcc
7 years ago
I use a batch file when I start sysprep. One of the steps is:
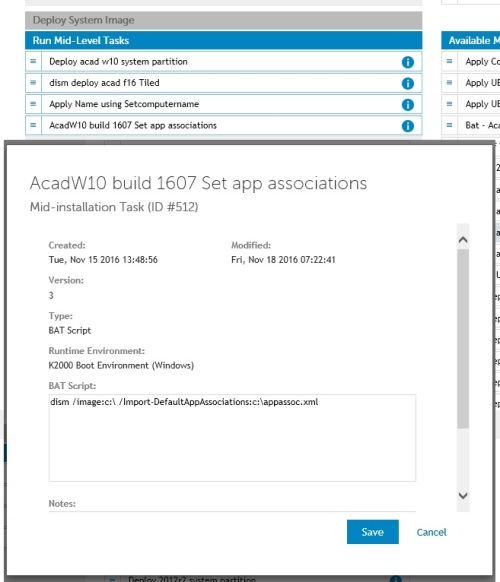
Dism /Online /Export-DefaultAppAssociations:c:\AppAssoc.xmlThen as a mid level task I apply those
Comments:
-
Cool. I have been changing the registry for this need but this method looks more reliable. Thanks. - chucksteel 7 years ago
-
So here's what I did, and the source of my frustration.
I set my defaults apps for Music Player, Photo Viewer, Video Player, and Web Browser is the usual Win10 Default Apps page.
I then set defaults by app, because simply setting as default above doesn't actually set full defaults.
For example, Adobe Reader has 7/8 defaults - the 8th one which really matters is the .PDF file association. In my build, I set all my apps with full defaults (Reader, VLC, Firefox, etc) and used Powershell to export my default apps XML to my desktop, which I then moved to it's final location.
That file, along with my custom wallpaper, login, and lock screen image go into C:\Defaults folder. This folder is set to hidden, but not the files inside.
I set Administrative Templates\Windows Components\File Explorer to 'Enabled' and the location is set to C:\Defaults\MyDefaults.xml
This image was built off-domain using the built-in Admin account and joined to the domain during the image deployment process, which worked fine.
Logging in as a domain user & admin, my file associations are not there and I'm not sure why this isn't working.
Is there a common and otherwise known step that I'm missing that I've simply overlooked?
For example, CopyProfile wasn't working for me when I was building from a local admin account I created, thus I started building from the built-in Admin account and got around that problem. - phillybits 7 years ago -
Additionally, in your bat script:
dism /image:c:\ /Import-DefaultAppAssocations:c:\appassoc.xml
/image:c:\ refers to.....my ongoing image? Is this the target system, which then calls the location of the file?
What I'm asking is if this is custom to YOUR image, or if dism /image:c:\ /Import..... is the proper general cmd?
Thanks, - phillybits 7 years ago-
In the batch you want to export and mid level import
https://technet.microsoft.com/en-us/library/hh825038.aspx - SMal.tmcc 7 years ago-
file can be any place. you need to create (export) prior to launching sysprep and sealing the image. Then apply (import) prior to it booting after sysprep. the location of the file just needs to be reachable, it can be in the image, on a share, on a boot stick, on the kbox.
You can even take an already imaged machine and fix it by booting to a winpe stick and applying. It has to be offline to import and the boot stick makes it offline at that point - SMal.tmcc 7 years ago
