
**SUPERCEDED BY CHICKEN**
To begin with, you’ll need to make sure the computer you wish to connect to is allowing VNC connections and that you know the IP address and password details for access to the computer.
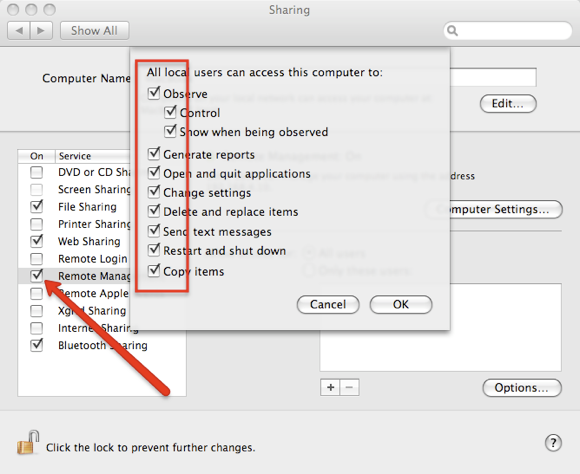
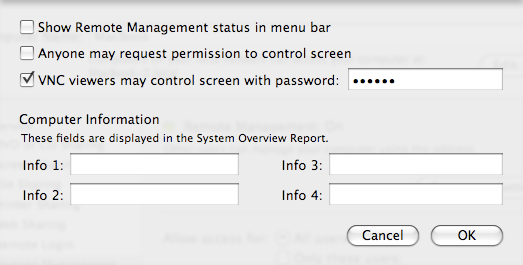
To allow VNC connections on a Mac, go to System Preferences > Sharing. Check the box for “Remote Management” and check all the applicable boxes in the popup window, depending on how much access you want to give out. Then click on “Options” and check the box to allow VNC connections with a password. Choose a password. When you click “OK” you should see that Remote Management is on and which IP address to use.
Otherwise, to find the local IP address on a Mac, go to the airport symbol and choose “Open Network Preferences” (or go to System Preferences > Network). The IP address will be shown clearly on this screen.
To allow VNC connections in Windows, the Windows machine will need to have a VNC client installed, such as the free RealVNC and configure it to use port 5900 and to use a password for access. To find the local IP address in Windows, open up a terminal (by going to Windows > Run and typing “cmd“) and then type “ipconfig“.
For access via the Internet, it’s a little more complicated. You will need to know the IP address you’re using in the real world, so head to WhatIsMyIP to get it. You may also need to set up port forwarding on the router to ensure the port 5900 is sent to the VNC server on the IP of the Windows computer.
If you want to use VNC to help a relative with tech support, for instance, you might need to set this up in advance and perhaps talk them through the steps to get the new IP address to ensure you can log into their system.
For every computer you remotely connect to with Chicken of the VNC, you’ll need to set up a new connection. From the previous steps, you should now have the details you need ready for use.
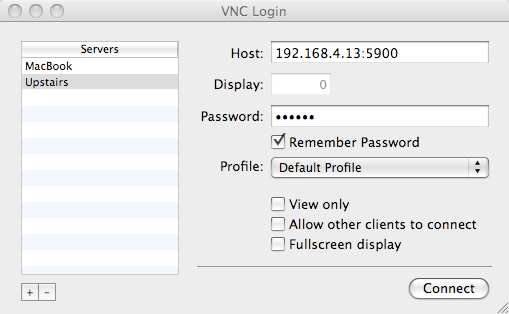
Click the + button to add a new connection and give it a name. In the host field, write the IP address followed by a colon and the port number. Put the password in and click connect. You should see a window pop up automatically where you can control the machine.
As you can see, the main trick to setting up a VNC connection is in ensuring the computer you wish to connect to is willing to accept the connection. Chicken of the VNC itself is pretty straightforward and just gets the job done.
View inventory records anonymously contributed by opt-in users of the K1000 Systems Management Appliance.