
The features of the Dell | KACE K1000 Systems Management Appliance are exceptional for managing a distributed desktop environment. But what about managing the servers in your environment? Obviously, most of the K1000 features also work well for managing servers, such as automated inventory and machine labeling, server operating system patching, Dell driver and firmware updates for servers, OVAL and SCAP vulnerability assessment, scripted configuration management, and reporting. A key feature that’s often a requirement for server management that you may also need is active system monitoring based on protocols like SNMP or IPMI. While the K1000 can perform SNMP scans to assist in device discovery, it doesn’t receive SNMP traps to assist in identifying issues with those servers. However, Dell does provide a freely available tool that can capture SNMP and IPMI alerts, catalog and filter these alerts, and forward them to other services for escalation and remediation. This technical note provides step-by-step instructions to integrate Dell’s freely available OpenManage Essentials console for system monitoring with the K1000 Service Desk for managing fault resolution.
At a high level, these steps are as follows:
- · Install and configure Dell OpenManage Essentials, including device discovery.
- · Configure Service queue in KACE
- · Create an E-mail Alert action in OME
- · Test E-mail Alert action in OME
Install and Configure Dell OpenManage Essentials.
Dell OpenManage Essentials is a Windows-based systems management console that replaces Dell IT Assistant. A physical or virtual server running Windows Server 2008 will be required to run OME. This installation is quite simple and largely self-contained. The one exception is if you plan to manage a large environment. OME includes Microsoft SQL Server Express for small deployments, but supports use of Microsoft SQL Server Enterprise if you plan to manage a larger deployment. The software, as well as installation instructions and documentation, may be found here.
Once you have OME installed, launch the OME console and select Manage -> Discovery and Inventory.
In the left pane, select Discovery Ranges-> Add Discovery Ranges to define an IP range for discovering your servers.
Enter the IP address / range or a list of DNS hostnames for the machines you want to monitor and click [Finish].

Configure Service desk and Service queue in KACE
The next step is to create your K1000 service desk queue so it can receive emails from OME. We’ll set this up before configuring the email alert in OME since we need the email address for the service desk queue to complete the OME configuration. To simplify this task you can download a sample queue, called OME_Queue.kpkg, and upload it to your K1000 as follows:
Connect to the clientdrop network share on your K1000. On Windows, do this by going to \\< your K1000 host >\clientdrop file share and logging into the share using the password you have configured for the share within the K1000.
Copy the downloaded Ome_Queue.kpkg file to you clientdrop share.
Log into your K1000 and go to Settings-> Resources-> Import K1000 Resources.
From the dropdown on the left, select Choose Action ->Import Resources(s) from SAMBA Share.
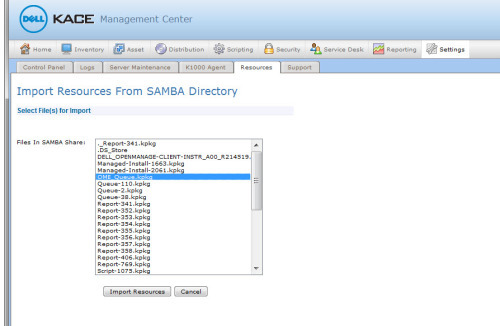
Pick OME_Queue.kpkg from the list of files and select [Import Resources].
You’ll now see a Queue resource listed called OME that is imported into your K1000.
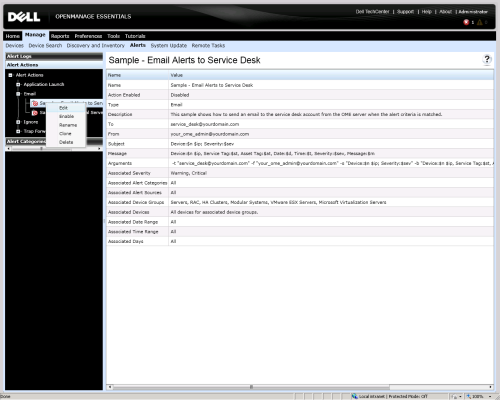
Now go to Service Desk-> Configuration-> Queues. You’ll see the OME queue listed there. Select the queue by clicking on the name.
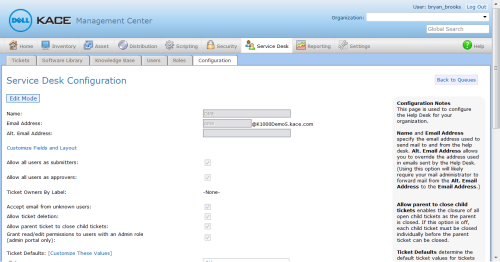
Note the email address of the queue. This is the email address that will be recognized within the K1000 as the queue to receive email tickets from OME. If you wish to use a different email address that is externally defined in your email environment, and then forwarded to this address, you may specify that in the Alt. Email Address. For the purposes of this article, we’ll assume that the queue’s Email Address is being used. When you configure the email alert in OME, this email address will be the TO: address in the OME Email alert action.
Also note that there is no specification for Ticket Owners by Label. This is simply because user labels and the assigned users will be specific to your environment and cannot be assumed for the imported queue. Everything within the imported queue may be customized to meet your requirements.
To define custom fields, from within this Service Desk Configuration page select the Customize Fields and Layout link. Notice that the Category Values have the same set of default values supplied in the initial installation of OME. These category values may be used to manage ticket routing to different owners or to other queues depending on how to want to process incoming alert tickets. If you change or add categories within the OME console, you will want to make a corresponding change here to reflect the new category value by selecting the + button to create a new value, or the edit icon (pencil) next to a particular value if that value has changed.
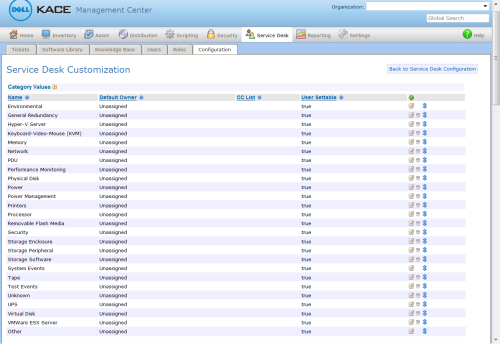
Also note that the Priority Values have been modified to match the Severity values provided by OME. Now when these values get mapped from the OME alert action we’ll create next, we’ll get the same values in the service desk ticket that were generated from OME.

To capture attribute values from the OME email alert, the queue must be configured to accept these values on User Create. The fields that are configured in this way in the sample queue are:
- · Title
- · Impact
- · Category
- · Priority
- · Machine
- · Asset
- · Custom_1 (we’ll use this to map Service Tag from OME in our example)
- · Custom_2 (we’ll use this to map Asset Tag from OME in our example)
- · Custom_3 (Create Date and Time from OME in our example)
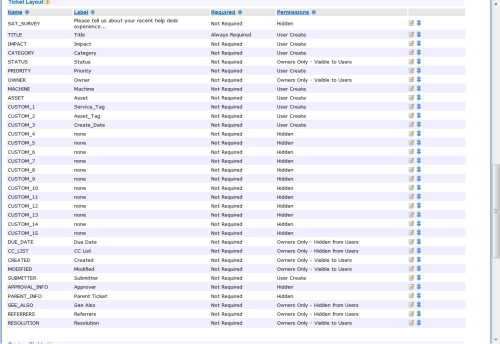
Of course, the desired attributes to collect from OME may be modified by editing the field configuration by clicking on the edit icon (pencil), and then configuring the appropriate mapping in the OME alert action. Let’s now take a look at how we create the alert action in OME. Take note of the Field Name and Label. Either of these names may be used to complete a mapping in OME, as we’ll see below.
Warning: If a field label will be used in a mapping, make sure the label does not contain spaces (e.g. “Asset_Tag” rather than “Asset Tag”). While a field label may contain spaces in the K1000 user interface, data cannot be mapped via email if the name contains a space.
Create E-mail Alert action in OME
OME has the capability to filter alerts that have been captured and forwarding filtered alerts to external applications, email, forwarding the SNMP trap to yet another console. In the case of the K1000 Service Desk, we’ll use the email configuration to manage the integration.
Within the OME console, select Manage -> Alerts
In the left pane, select Alert Actions-> Email
Right click on Email and select New Email Alert Action OR right click on one of the sample pre-canned alert action and select Edit.
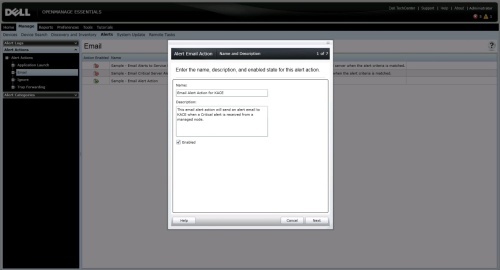
In Name and Description, provide e-mail alert action name and description.
Check Enabled checkbox and Click [Next].
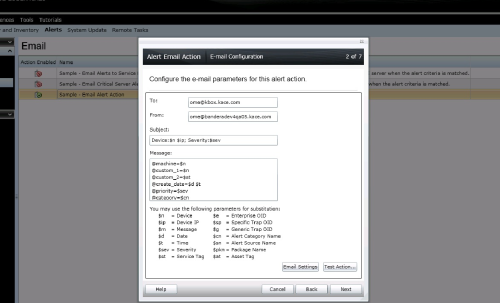
In E-mail Configuration, provide the recipients of this e-mail and sender in To: and From: address fields.
Make sure the To: e-mail address in OME matches Email Address in KACE Service Desk Configuration (or the Alt Email Address if you are using a different alias in your email system and forwarding email to the Service Desk Queue. The From: address will receive confirmation and/or error messages back from the K1000, so make sure this is a valid email address.
Note: Separate each recipient or distribution list with a semi-colon. During testing, you can supply your own email address to confirm email messages are being sent out from OME. You may also want to use your own email address as the FROM: during testing to see the confirmation or error messages that may be getting generated.
Provide a Subject. You may use the pre-defined alert substitution parameters provided by OME in the subject. You should consider how you want to process the alerts within the service desk as part of defining your subject, as these will appear in the list of tickets for the queue and should be readily identifiable according to the criteria that is important to you.
In the Message field, create a map of KACE service desk and OME pre-defined alert substitution parameters. For each of the supported parameters the Email alert action fetches alert data and assigns it to the corresponding parameters on KACE Service Desk.
Ex: @machine=$n
@custom_1=$st (or @Service_Tag=$st)
@custom_2=$at (or @Asset_Tag=$at)
@custom_3=$d $t (or create_date=$d $t)
@priority=$sev
@category=$ct
@asset=$n
@machine=$n
$m
Warning: Parameters prefixed with “@” are defined in the KACE Service Desk. Parameters prefixed with “$” are defined in OME and are substituted with actual value when E-mail alert action is triggered. The email body MUST begin with an “@” for the K1000 appliance to recognize that attributes are being mapped. If any text appears in the message body before the first “@”, all subsequent data mappings will be ignored.
Note: If the computer being monitored has the K1000 installed, mapping @machine=$n will result in the link to that machine in inventory appearing in the resulting ticket. This is especially useful when resolving tickets. Also, if a non-computer device is being monitored (e.g. switch) and that device has been configured in the K1000 Asset module, then the link to the asset will appear in the ticket. Also, be sure to include the “$m” attribute at the end of the email. This is the text associated with the alert and will be added in the comments section of the ticket so the administrator knows what issue needs to be solved.
Click Email Settings and provide SMTP server name or IP Address.
Make sure to test the feature using the Test Action button. This should send a sample e-mail to the all the recipients.
Click [Next].
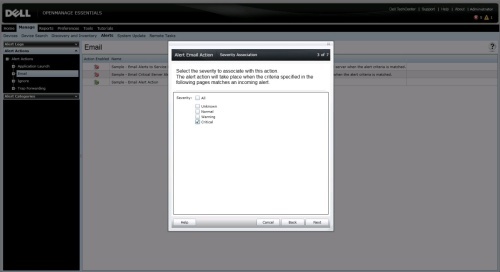
In Severity Association, assign the alert severity to which you want to associate this e-mail alert. This allows you to filter the alerts that have been raised in OME to only those that are of a sufficient severity to warrant remediation in the K1000. In the imported queue configuration on the K1000 these values have been configured for the Priority of the ticket.
Click [Next].

In Categories and Sources Association, assign the alert categories source to which you want to associate this e-mail alert. In the imported queue configuration on the K1000 these values have been configured for the Category of the ticket. If you customize the categories within OME, you should also modify the category values in the service desk queue on the K1000.
Click [Next].
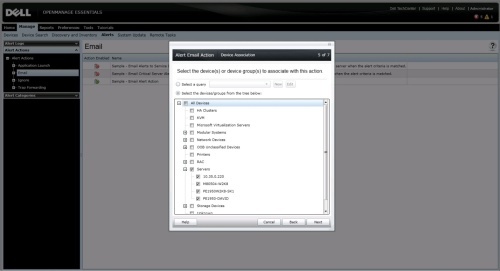
In Device Association, assign the device or device groups to which you want to associate this e-mail alert. You can use this to filter the alert emails that are being forwarded to the K1000.
Note: There currently isn’t a way to map the Device Association to the email alert that is sent to the K1000.
Click [Next].

In Date Time Association, enter the date or time range on when this Email alert action is active and then click [Next].
In Summary, review inputs and click Finish.
Sample Workflow of Alert received in OME and KACE Service Desk Ticket created.
OME receives a warning alert from a monitored server indicating that the temperature sensor identified a warning condition, and triggers an E-mail alert action which in turn collects alert data and sends an e-mail to the KACE service desk.
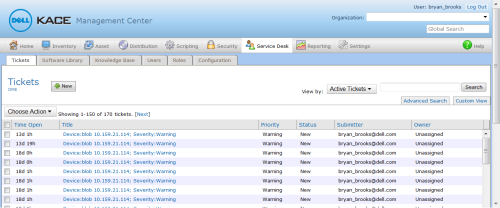
The E-mail received is parsed by KACE Service Desk. It then creates a Service Desk ticket under OME service queue based on the criteria set.
Click on the Service Desk Ticket to view the details.
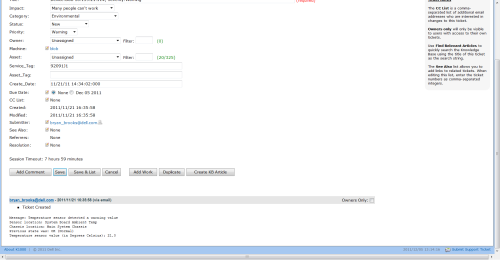
The ticket has been assigned a category of ‘Environmental’ which is coordinated with the event category in OME. The machine will have a link for the machine in the K1000 inventory allowing the administrator to click on that link and obtain information about the hardware and software installed on that server, how the system has been updated and patched, the service ticket history for that machine, and a history of all changes to the server. All of this information will help the administrator in assessing what might have caused the issue and how best to resolve it. Also notice that the messages at the bottom of the ticket provide diagnostic information as provided by OME.
Conclusion
The Dell | KACE K1000 Systems Management Appliance and the OpenManage Essentials Systems Management Console can be combined in a simple affordable approach to managing servers, including active system monitoring and issue resolution. The total solution is easy to install, easy to configure, and easy to manage over time.
For additional ideas on how to integrate other OpenManage tools with your K1000, take a look at the Managing Dell Servers with the Dell | KACE 1000 and Dell OpenManage white paper.

NOTE: If you encounter an error: "TICKET TITLE REQUIRED," when attempting to close your ticket generated by this setup, your settings may not be incorrect.
Spend a moment and go back to check your Configurations. If your TITLE customization is set to "TITLE REQUIRED"... change the value for TITLE to "Not Required."
- then SAVE on that line and remember to SAVE at the BOTTOM OF THE PAGE (sometimes people forget this step) so that the changes will take effect overall.
After making these changes, go back to the ticket in question. Next to the "Title" field, there should NOT be (in red) "Title Required." If the settings were saved correctly.
- now attempt to complete the other requirements needed for the ticket (name, comments, etc.)
- then proceed to CLOSE and SAVE the ticket...
The issue should be resolved and you should be able to close tickets that present you with the error "TICKET TITLE REQUIRED" - KACE_Troy 10 years ago